-1.png?width=400&height=164&name=DWRLogoClassic%20-%20Copy%20(2)-1.png)


Digital WarRoom is an eDiscovery software platform that provides the capability for law firms and legal departments to perform robust document review. Once you preserve and collect all the data that could be potentially relevant to your investigation, you should process it into an eDiscovery tool. This will involve extracting all possible metadata as well as indexing the words in your files. Once all your data is processed, the main role of eDiscovery software is to help you cull the data and make a range of decisions on each document. We call this your “attorney work product”. As you mark documents, add descriptions and create privilege logs, you are creating metadata which will now be associated with each document.
In the old days, a reviewer would sit in the back of a warehouse and review exponentially large batches of documents by hand. After reviewing every document for relevance, if the attorney found a new lead, they would have to start over completely. Now with the proper technology, you can find the relevant documents sooner and have immediate access to a range of marks and issue codes to apply to each document.
After conducting some preliminary early case assessment, set up your own custom Protective Order Designations (PODs), Marks, and Issue Codes that match your requirements.
Protective Order Designations
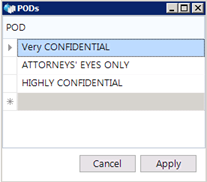
Ask yourself if you have or need a protective order. Protective Order Designations (PODs) define the confidentiality of a given document. Some examples of PODs would be confidential, highly confidential and attorney’s eyes only (AEO). You can add more custom PODs in the PODs window by clicking the bottom row with the asterisk (*).
Usually, both parties should agree on acceptable PODs during the ongoing 26f meet and confer conference. These designations should certainly be agreed upon prior to exporting your production to the opposing party.
Marks
Marks tell you whether or not to produce the document. The process of marking documents can be broken down as the following two types of review.
1) Review for relevance - produce responsive documents
2) Review for privilege – do not produce privileged documents
Reviewing for relevance and privilege each require two vastly different hats. Your goal is to create a marking palate so that every document gets one mark. Digital WarRoom software includes some “out of the box” marks for document review.
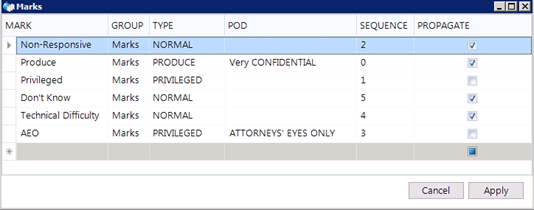
You can also create custom marks by clicking the * in the bottom row and entering in the information for your new mark.
Depending on your workflow preferences and how you chose to set up your marks, you may be able to speed up your workflow by aggregating certain decisions within the tool. Here's what I mean.
Privilege Type Marks
Marks can be assigned a type. This is especially useful for privileged type marks. A privileged type mark will enable privilege log features such as filling out privileged metadata in the Work Product Inspector. You may choose to create several privilege type marks with different privilege reasons.
When you mark a document as privileged, we strongly recommend that at some point you come back and fill out the privileged metadata within your priv log. This privilege log will include a drop down menu where you can select from a list of “canned” or custom privilege reasons. Depending on your workflow choices, you can forward some of this work over to your marks, which are accessible quickly by right clicking on a document. By creating multiple privilege type marks which represent different privilege reasons, you can get a jump on your privilege log and complete an efficient first pass privilege review using only the right click and mark function.
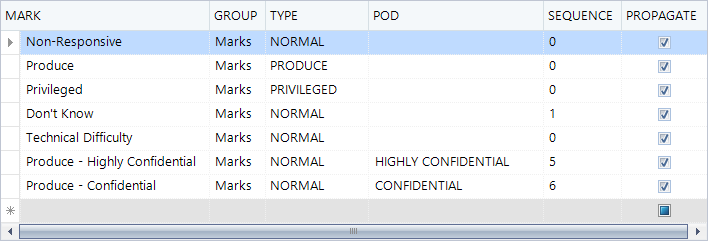
Protective Order Designations Mapped To Marks
To speed things up you could also map a POD to a specific mark. In this example, we have 2 different produce marks which map to different PODs. As I mark a document as “Produce – Very Confidential”, my document is now automatically assigned the POD “Very Confidential”. Now in my production/print settings I can for example print the POD in the bottom right corner of that tiff image.
Mark Propagation Policy
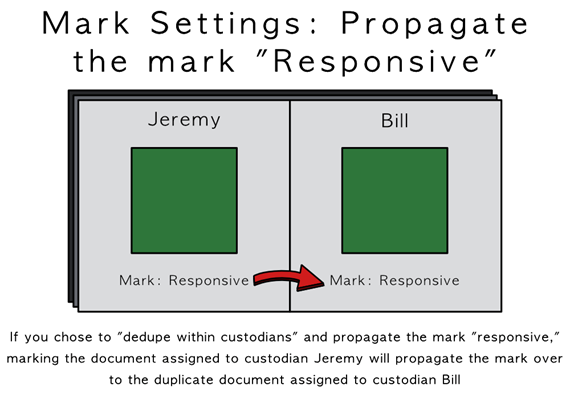
As you create your marks, consider what you set as your deduplication policy in the policy wizard. For example, if you decided to dedupe only within custodians, consider that you may have multiple dupes still present, one from each associated custodian. By checking the box to propagate a particular mark, anytime that mark is used, it will propagate to all duplicates. In our Deduping and Propagation Policy article, we explain why you usually do not want to propagate privileged type marks.
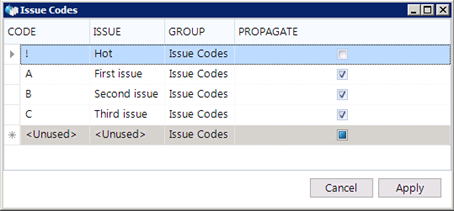
Issue Codes
Issue codes are designations meant for the user to specify how a particular document fits into the claim construction. At this point you should have an outline with foundational arguments and sub-bullets for how you will make your case and the types of information you are looking for to support that case. Just because a document is relevant does not necessarily mean it fits into your claim.
When you do find a document that fits into your claim construction, you can add as many issue codes as you want. Think of an issue code as a bullet on your claim construction outline. The more issue codes you add, the more descriptive you can be. This way, as you touch each document, you can record as much information as possible.
Simplicity vs Granularity
Unlike marks, you can add unlimited issue codes to any given document. Moreover, you could go through the effort to build 1,000 issue codes. However after 30 or so issue codes, reviewers will spend more time categorizing documents and figuring out which issue codes to assign. In this case, granularity loses effectiveness because the speed of binning documents gets so slow that client costs are going up. Your workflow and your number of reviewers informs how detailed you should set up your marks and issue codes.
In fact, no two reviewers will make the exact same decisions on every document in a database, but you can take precautions to avoid serious errors or discrepancies. For example, when creating issue codes, you can simplify the binning of documents by reducing your issue codes to a small collection of main topics – represented in your claim construction outline as ABCDEF. Then decide the 123, 123 later. If you have 80 points, consider collecting them into 10 or 15 categories.
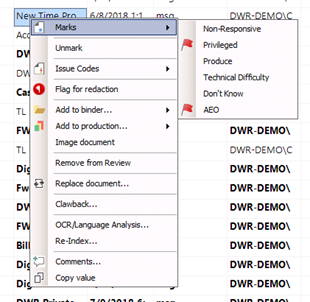
Digital WarRoom has several avenues for marking documents and creating work product
1) Right click – Assign a Mark or Assign Issue Codes
2) Work Product Inspector
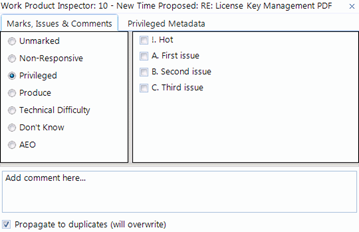
The work product inspector will automatically populate the existing marks and issue codes assigned to the currently selected document. In the next tab over (Privileged Metadata), you can build out your privilege log on the fly. You can pop this window out or place it anywhere on your screen to aid you as you conduct your document review.
Assignments
As a Project Manager, how will you assign tasks to each reviewer?
What are you asking of your reviewers? How many people will be reviewing documents? Do they all understand the context of the merits of the case? Reviewers need to understand the context of the case and how the client operates. You can’t sit review attorneys down and say “review for relevancy” without context. All reviewers must be briefed on what the claim is.
Split up and organize the review across multiple reviewers using assignments. Assignments are normally used to create document batches split by purpose. For example, an attorney reviewer with a business background will be more likely to understand documents from the finance department. Subject matter is important. Expert reviewers could get specific assignments while all other reviewers get the general buzz. How is your claim construction laid out? Are there technical or non-technical duties in your review? Could you filter your documents by file type? Foreign Language? Think through the way you create these assignments. Think through your filtering logic to ensure reviewers do not look at the same set of documents and that documents are not skipped over.
You may also decide to assign tasks based on the type of review. For example: Sean reviews for relevancy, Susan reviews for privilege/confidentiality and assigns redactions to Bob. As a reviewer, ask yourself: are you reviewing for relevancy, privilege and/or claim construction? If you are a solo reviewer, you may want to go through full range of decisions and actions as you touch each document. When considering the order of your workflow – be aware of other actions which you must eventually complete:
- Do I want to build my privilege log later or right away? Should I immediately decide the type of privilege? And enter metadata? Attorneys eyes only, work product? If you have many reviewers, you may want to avoid making vague designations in which the reason for that mark might not be obvious to a second reviewer. For example, if you mark a document as privileged, consider filling out the corresponding privilege log immediately (or set up your marks in a way that each privilege type mark specifies the type of privilege).
- Do I want to make redactions immediately? Or assign to a junior paralegal?
Conclusion
Your workflow decisions should first and foremost be set up to meet your requirements. Once you and your team are fully trained on the tool, everyone will get a better feel for their personal preferences for how to accomplish each specific action. eDiscovery projects can deal with exponentially large volumes of data. After creating your marks and issue codes, continuously come back to this topic and make sure that each piece of attorney work product is useful and does not complicate your project. At the same time, check in periodically with your reviewers to make sure they understand the context of the case and the nuances of how it relates to relevancy, privilege and claim construction.
If you found this article interesting, be sure to subscribe you and your team to our monthly blog distribution email. This email list is solely for blog distribution purposes and we promise to only send one email per month. To subscribe, simply scroll down and fill out the "Subscribe" form below the comment box.


Comment On This Article