-1.png?width=400&height=164&name=DWRLogoClassic%20-%20Copy%20(2)-1.png)


What is eDiscovery Processing?
eDiscovery processing refers to the catalog, extraction, and organization of data from a collection of files. This step is foundational to help you comply with eDiscovery obligations in a reasonable time frame. Most notably - the following actions will take place.
1) Email, attachments, and document metadata are processed into a database - allows you to filter and sort by one or multiple metadata fields, and view analytical reports
2) Plain Text is indexed (with option for OCR) - allows you to search keywords
3) All documents are assigned hash numbers - allows you to de-duplicate documents, group by email thread, group by document family.
Tip #1: Understand Your eDiscovery Tool
Most eDiscovery processing software interfaces will consist of simple drag-and-drop mechanism to upload documents. Let’s take a look at how easy processing is from the user interface perspective.
This step is easy because technology does most of the work for you. Many eDiscovery service providers overcharge for processing. In reality, the processing phase is the easiest step in the entire workflow. The principle that Digital WarRoom was founded on is that given the right tools, you can do this yourself.
Container files: The first thing that happens behind the scenes when you drop data onto Digital WarRoom is the identification and expanding of containers. “Containers” is a term of art for describing grouped files uploaded to Digital WarRoom. A container could be a zip file or a PST. The tool will expand containers automatically and immediately start extracting metadata on a document level. You do not have to unzip a zip file before uploading to Digital WarRoom. In fact, you may even want to compress a large folder by zipping it up before uploading to Digital WarRoom. The smaller your native file (and imaged file!) data amount, the faster your processing speed.
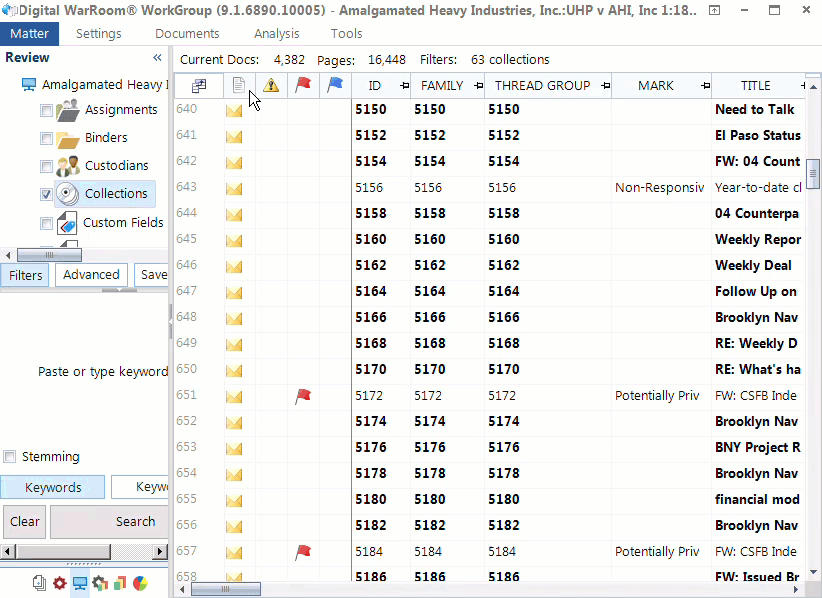
Document List and Metadata: The art of processing is analogous to the art of populating a giant excel chart. We call this excel chart “The Document List”. Here’s where technology comes in. With Digital WarRoom, the excel chart is populated automatically. Each row in the chart represents one document and each column represents a different metadata field in the database. There are around 80 different metadata fields that can be extracted from files and viewed in the Digital WarRoom document list. Metadata is data that describes or gives information about the file. Certain types of metadata may be specific to a certain file type. For example, an email may record: To, From, CC and BCC while a Word document records: Last Printed, Author, etc.
Here are a couple of popular resources on metadata:
Here are some more examples of possible metadata which are captured in Digital WarRoom.


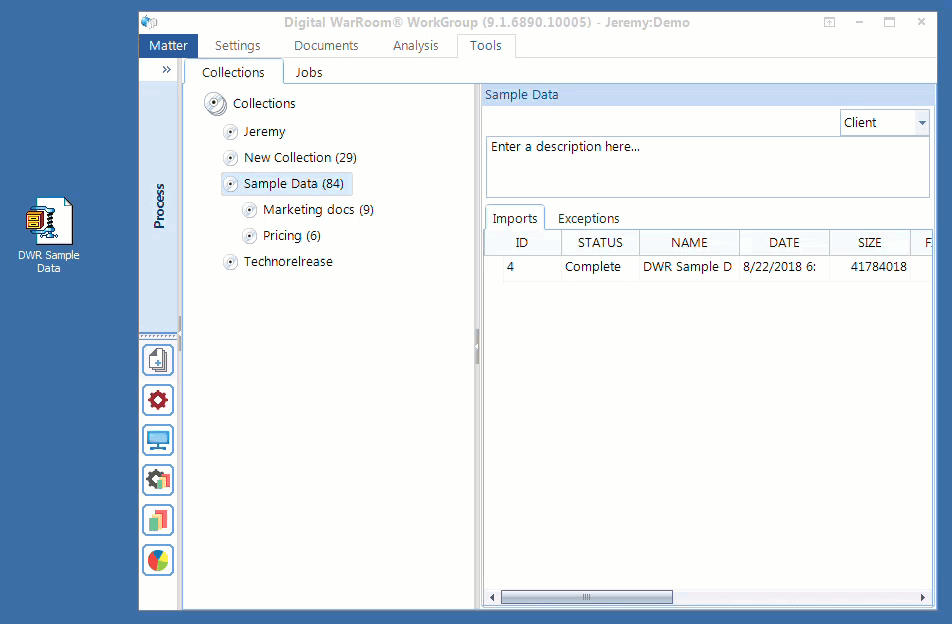
Here is an example of a document list with populated metadata.
Email Families: An email itself can be a container if the email contains an attachment. We call this a “family”. The relationship between these documents are recorded and are usable as search criteria in Digital WarRoom. For example, if you search by including families, you will return all documents that hit on that search along with their family members. Another example of a family could be a PDF that was embedded into a Power Point Presentation. Additionally, Digital WarRoom maintains the relationship and ordering of emails in email threads.
Key Word Indexing: All files will be indexed upon processing. As mentioned in our Key Terms section, indexing is the act of finding words in documents so that the "keyword search" function of discovery can be performed quickly. Digital WarRoom records all words in your documents making it easier later on when you begin searching keywords, as Digital WarRoom will return files that hit on your keywords and aligned with your filter criteria. Typically, a Word document can be indexed, but a PDF cannot be indexed because a PDF is essentially an image of a document. To solve this issue, Digital WarRoom has the ability to OCR documents such as PDFs and images. If you chose to OCR, Digital WarRoom will scan all files for words that could not be indexed. For example: if you had a JPEG image of a stop sign, OCR will pick up the word “stop”. After OCRing, your keyword search for “stop” will return the same image. Indexing happens automatically upon processing, but OCR does not. You may also collect audio or video files that will never be indexed or OCRed. We can use a voice to text transcription tool for this purpose upon request.
Path and Locus: Digital WarRoom will keep track of the original folder structure so that you can take note of these organizational details as you go through your document review. This is useful if you plan to organize your collections by mirroring the folder structure that was provided to you. If the files were preserved correctly Digital WarRoom will also keep track of paths and operating system metadata.
Tip #2: Consider The Big Picture - Identification, Preservation, and Collection
To follow best practices in processing, first you must understand that although processing is the first wizard in the Digital WarRoom software, your electronic discovery workflow actually begins outside the tool with proper identification, preservation, and collection of files.
Consider the big picture – otherwise you will get stuck in the weeds quickly. The more you get caught up on unimportant details, the more time, money and effort you lose, making you susceptible to being distracted by the adverse party.
This tip is a brief reminder to carefully consider all possible collection sources. Our more detailed eDiscovery Checklist Manifesto covers the details of how to correctly interview and define that data canonical of your client.
Correct preservation is a workflow outside of our tool. In most cases, the strategy is up to the preservation advice of the attorney - they know where to find relevant sources of data. The team here at Digital WarRoom cannot understate the importance of identification, preservation, and collection in litigation. You will significantly increase the success rate of your eDiscovery review by preserving and collecting from as many (relevant) data sources as possible. We start broad and funnel the files into review, then mold your review corpus into a polished production.
 In identification, did you consider different forms of email? A typical Outlook or Office 365 client can be exported into a PST. This is a container file that contains a significant amount of metadata on every email in your account. When a PST is dropped onto Digital WarRoom and processed, you will have access to information that may not have been previously viewable. For example, if someone was Bcc’d, their name will populate in the corresponding column in DWR.
Many people today use cloud email clients such as Gmail. These email boxes can also be exported for local use in your eDiscovery project.
Did you ask about all possible hard drives, flash drives or desktops? Even a thumb drive may contain important files that could easily be kept off the map.
Consider all possible sources of files as well as all possible channels of communication. For example: young tech startups communicate primarily by text, not email. If texts are the common business communication channel for the party in question, then text messages are necessary in collection. Text messages are more difficult to collect for eDiscovery purposes because all text messages sent possibly over many years between two people are contained as one communication (and therefore one document!). When does one conversation start and end? Varying data sources may require different collection methods and strategies.
As an attorney investigating to find all relevant data sources, you must ask the right questions. What are the issues? How do they communicate? Where are all the places they may keep files? Which issues are likely to exist in which departments? What are the platforms they use and record information in? Know the data map of the client, go through everything they could possibly have and drill down from there. In high stakes litigation, you cannot miss anything, not even because you might get sanctioned - it could help you!
Do they have a CRM? Many attorneys don’t know that Customer Relationship Management software such as Salesforce and Hubspot even exist. A CRM may contain valuable information about certain business practices or relationships with specific customers. Think about these things. You need to know where to find data that has probative value – that is data that is relevant and could resolve your dispute. Identifying useful or prejudicial data early on will help inform your risk management and settlement tactics. In the end, civil litigation is about property ownership and money.
If your attorneys need help with the preservation or collection stage, DWR can assist with free advice or with professional services for a fee. Digital WarRoom is focused on training clients to do it themselves. We are available to advise you throughout the process.
Tip #3: Understand The Collected Documents Prior To Processing
Early case assessment is an important step which can be considered before you even process the data into Digital WarRoom. When you obtain a new collection, start by answering some questions. What are we going to do with this electronically stored information? What are the facts of the case? What are we looking for? Do I have a relationship with the people who owned and knew the native files? What are my initial expectations? Has there been a settlement discussion or other civil procedure? What information would lead to an acceptable settlement?
Once you are sure you understand the context of the case, you should go through a general screening to understand what was preserved. For instance, if you get a zip file, open it first and see what is inside. First, look at the folder structure. Is this folder structure artificial? By artificial, we mean that the folders are setup specifically for the purpose of eDiscovery document delivery. For example the folders could be: Company emails, documents for litigation, keyword hits on office files, contracts for the last 5 years, file server. Some companies who are subpoenaed may have to create and compile a new folder specifically for the purpose of delivering the files in question.
Example: If DWR had to provide business contracts over the last 5 years to outside counsel, we would probably create a specific folder to provide documents dating back to the required 5 years. Since you may be on the receiving end of this transaction, maintaining the initial folder organization is probably useful to you. Now you can answer questions like: why is this document in this folder? If you are given four folders and those folder names don’t make sense to you, email the owner of the native files.
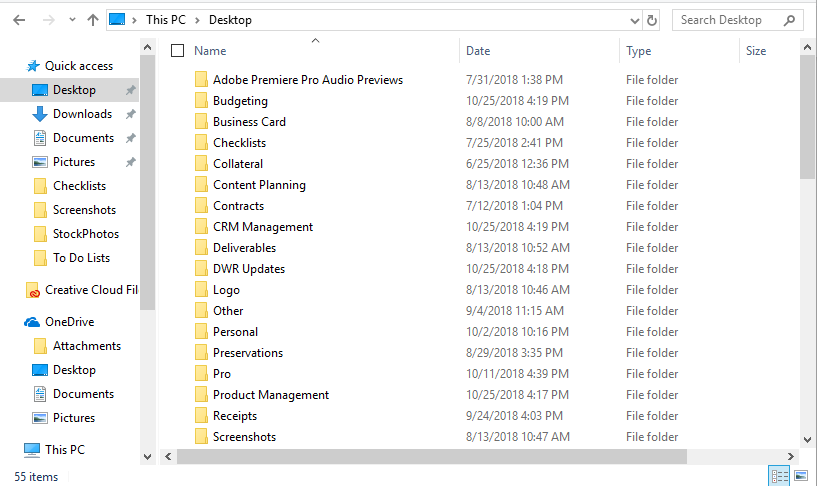
Here is an example folder structure taken from a desktop used for marketing.
Rule of Thumb: The processing stage requires organization at a folder level whereas the review stage requires organization at a document level. You do not have to review specific native files prior to processing, but your goal is to gain an understanding of how the potentially relevant documents are organized. These insights – in addition to metrics like file names, file size and extension type – will help you understand the contents of the documents in a broad sense without opening each document.
If you are delivered a pile of documents, it may make sense to move files around to make ingestion easier. Were you given a documents directory? Desktop folder? Maybe don’t move that around.
It is possible that after your initial screening, you have found collections that are irrelevant to your investigation. Let’s say you would like to exclude the “Vacation Photos in Las Vegas” folder or a hard drive labeled “Marketing Collateral”.
Tip: Take notes of your actions. “We have determined nothing of probative value in hard drive 22-03. We will put this in a bankers box in the back of the law firm”. Especially if this hard drive contains large amounts of irrelevant data, you will reduce costs by excluding it prior to processing. Narrowing down your documents is a practice of cost management, time management, and risk management. It is up to you how you make these decisions.

Tip #4: Organize Your Collections In The Tool
When you go to add a collection, first create the collection folder – we call this a landing spot or to use a metaphor – a baseball mitt.
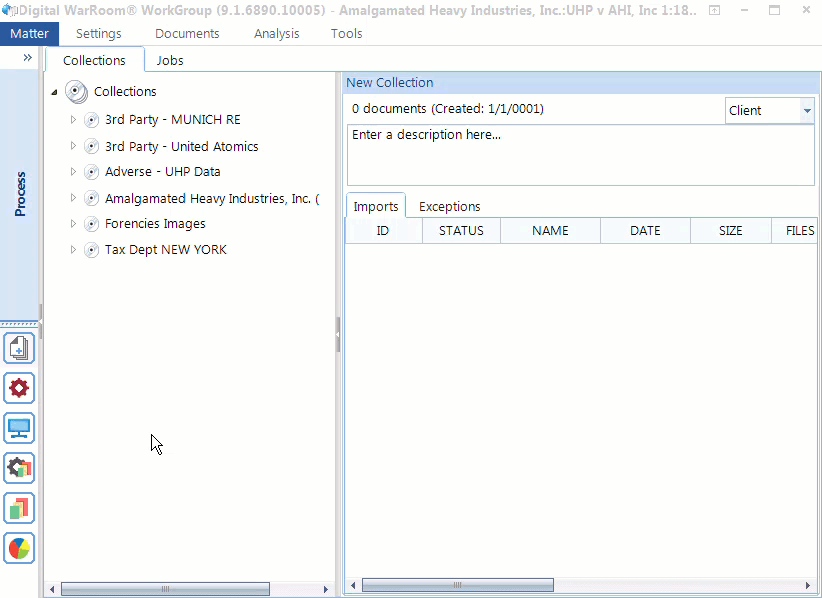
You may upload multiple imports to a single collection. For example, one from a hard drive, a CD and an email. Add a descriptive collection name and drag/drop your import onto the collection name. Make sure you name your collection something that makes sense to your organizational structure. You can organize your folders by topic, business department, date, location. Think of this as how you organize folders on your desktop in the file explorer. Are you the kind of person whose desktop is cluttered with a pile of hundreds of documents with different file formats? Or do you try to categorize everything into folders for easy access? Your organizational strategy depends on the content you have. Sometimes it will be useful to mirror the original folder structure. All eDiscovery platforms will mirror the folder structure presented during processing. You can always see that information, but typically you will have so many folders that you will need to create more general categories. You have the option of going as deep as you want with folders and sub-folders. In our experience, most people ignore the step of organizing folders. If you fall more on the unorganized side, think more about categorizing your imports into meaningful collections during your next project.
eDiscovery starts with well prepared, well documented preservation and ediscovery processing. When you add items, there is an annotation component. Six months or several years down the line, those audit trails will be available to you. That’s why when you process a collection, you should answer questions like “why, when and how is this data in my case?” You may think writing an additional label is hyper informative. At any time, someone (including yourself!) may come back and say “You collected this data on November of 2017. Why did you do it?” These are questions that over 50 years, attorneys continue to get asked.
Tip: “Please, your future-self begs you. Fill in the description when you add a collection, or when you create a production or a binder” – Robert Powell, VP at Digital WarRoom.
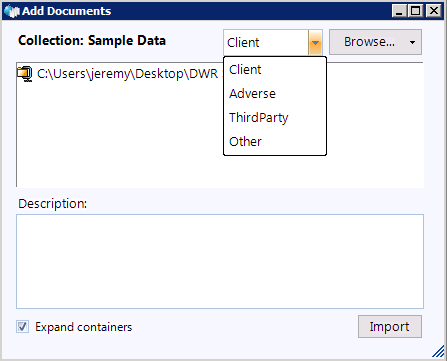
When you drop an import onto Digital WarRoom, the wizard will not only encourage you to write a description, but also will allow you to determine if collection came from client, adverse party, third party, or other source.
Tip: Do not forget to tag your files by provider type (Client, Adverse, 3rd party). This information will be a useful in creating your posting policy as well as for a filtering option in the review stage.
The “assign custodian” feature allows you to have cross sectional organization both by custodian and based on your folder structure. Therefore, you do not need to organize your collections based on the custodian. For example: “Jeremy’s Files” is not a useful collection name because you can simply assign the collection to the custodian “Jeremy”. “Jeremy’s Emails” is a slightly more useful collection name. It is possible that you can overlap collections and custodians. Let’s say you have three collections: Bob’s files from January, Bob’s files from February, and Sue’s files. Do you even need to assign custodians? Some reviewers don’t even use custodians, but Digital WarRoom recommends it as a best practice. Imagine in six months you have a new set of collections from Bob, if you assign them all to Bob it won’t matter which collection each folder is in. The files are from Bob. As your number of collections grows, you will be thankful for your initial organizational efforts.
Tip #5: Assign Custodians To Your Collections:
A custodian is the original owner or user of a collection of documents. You have the ability (and you are strongly encouraged) to assign a custodian to every collection. Admittedly, this is a topic that slips through and isn’t commonly discussed in our training. Passing your custodian designations through from review to productions will help you manage your case and respond to obligations. Folks do not populate custodians nearly as much as they should. The veracity, totality, and integrity of your production is at stake. Deduplication, production, prepare for deposition, prepare for adverse party - for all these events you will need to know that this collection was Bob’s email. Custodianship also helps you be more efficient.
The topics in eDiscovery are interwoven into each other. Client interviews can and should occur at many different stages of your project. In order to preserve files from all relevant data sources and conduct a review with the right context, you have to know all your custodians. For example. you should have interviewed all of your custodians back in the identification stage, while continuing to keep in touch with custodians throughout early case assessment and review. Do you have five or ten people who you know will be deposed? Ask them what the potential sources of data are. Ask them about how they communicate and keep in contact after the initial interview about understanding their data. For example, if you don’t understand why a directory structure exists in a hard drive with source code, talk to the custodian.
A common assertion for an attorney: “they sent me the data and don’t have time to talk.” Ask them a few simple questions. This is important. When you are looking over the collected data – ask yourself, “do I understand how I can make use of this data to assert claims in my case?” Keep your answers in the collection notes when you initiate collection processing.
Custodianship is not knowable programmatically and must be assigned manually. The custodian could be the original user of the documents or the person that provided you the native files. HR, Sales and Marketing could all be custodians – or London, Paris and New York if you want to treat each office branch as a custodian. This will help you conduct your review and respond to your litigation. After you have created your custodians and began assigning custodians to certain collections, you can ask: “is this all the data” and “is this how I should organize this?” This is all up to you. Digital WarRoom software just provides the tools to give you freedom in how you set up your review.
Tip #6: Carefully Consider Your Workflow When Processing Large Chunks Of Data
Digital WarRoom servers can easily handle TBs of data dropped onto the tool at once. However, this high magnitude data dump will probably be an overnight kind of job.
Recommendation: if you want to process a huge chunk of data, you need to know what you’ve got. Don’t just blindly drop 500 GBs onto the tool. This goes back to preprocessing. Have you looked at the folder structure? Do you need this as a pile of data or you want to review one chunk at a time? Can this data be reasonably split into logical divisions? Your upload will be easier in bite sized chunks for time efficiency as well as organization. For example: split your native files into November email, potentially responsive documents, and keyword searches across the network. If possible, split your folders into 3 or 4 collections as long as that makes logical sense. Do you have 30 folders on the root and you want to maintain the same folder structure? You could upload 4 folders today and 2 tomorrow. However, if you process only several of these folders at a time, you must keep track outside of DWR of what you did or did not process. Concerned about fulfilling your obligations on reviewing and producing documents in a 1 TB hard drive? Large data amounts may slow down the discovery process and make it more difficult to organize your data corpus. However, to ensure you meet your obligations relating to the ediscovery process, you should probably upload the entire hard drive all at once. Just be aware of the disadvantages of this strategy.
Alright, you've processed the data and organized your collections. What steps should you consider directly after eDiscovery processing?
If you found this article interesting, be sure to subscribe you and your team to our monthly blog distribution email. This email list is solely for blog distribution purposes and we promise to only send one email per month. To subscribe, simply scroll down and fill out the "Subscribe" form below the comment box.


Comment On This Article